MySQL · 源码阅读 · X-plugin的传输协议
Author: 原宇
本文主要通过阅读MySQL8.0源码来介绍X plugin如何通过X protocol与客户端建立连接
背景
MySQL5.7发布时自带了一个MySQL X插件,启用插件后,可以通过X protocol提供一个类似于MongoDB的服务。这个插件是默认加载的,show plugins可以看到。
mysql>SHOW PLUGINS;
+---------------------------------+----------+--------------------+---------+-------------+
| Name                            | Status   | Type               | Library | License     |
| mysqlx                          | ACTIVE   | DAEMON             | NULL    | GPL         |
| mysqlx_cache_cleaner            | ACTIVE   | AUDIT              | NULL    | GPL         |
+---------------------------------+----------+--------------------+---------+-------------+
X-plugin使用单独的协议(X protocol)来实现与客户端的交互,这个新协议利用了当前的行业标准protobuf(Google开发的一种语言无关、平台无关、可扩展的序列化结构数据的方法)来通信。protobuf可以将结构数据或对象转换成便于存储与传输的格式也就是序列化,同时可以保证这个序列化的结果可以被重建成原来的结构或对象。
X protocol
这个新协议主要从三个方面做了提升:可扩展性、性能以及安全性。
可扩展性
可扩展性主要来源于对protobuf的使用,其中定义的.proto格式的文件提供了X protocol的完整消息定义,protobuf可以基于.proto文件自动生成多种语言的代码。X protocol对.proto的使用可以使协议清晰明了,不再需要去分析消息格式。.proto文件中定义的信息使得在客户端连接器代码中实现X protocol变得更加容易,对协议进行编码只是所需工作的一小部分。
性能
通过X protocol可以将多个request打包成一个packet发送给X plugin的服务端,服务端会依次解析和处理每一个request,这是X-plugin的一个流水线功能(pipelining),这个功能的好处是客户端可以一次向服务器发送多个request,不再需要等待每个request的响应。
安全性
X protocol基于SASL(Simple Authentication and Security Layer,简单认证和安全层,是一种用于扩充C/S模式验证能力的机制)提供了多种认证方式。 通常包括三种方式:
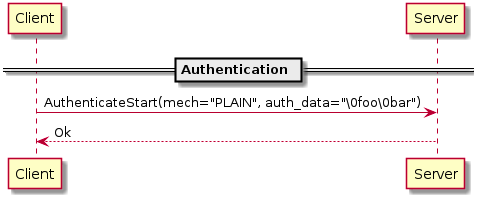
- PLAIN Authentication
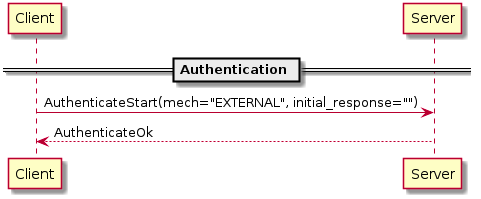
- EXTERNAL Authentication
- MYSQL41 Authentication
 PLAIN Authentication和EXTERNAL Authentication的认证过程比较简单,所以需要依赖SSL/TSL,如果服务端不支持SSL,就无法使用这两种认证方式。
MYSQL41 Authentication是一种挑战/应答的认证方式,客户端首先会发送一个认证请求,此时通常会携带需要认证的用户名,服务端查询到是合法用户后,会产生一个20字节的随机数作为“挑战”发送给客户端,客户端会将密码和随机数做Hash,生成一个字节串作为“应答”,服务端将应答串与自己的计算结果进行比较,如果相同则通过验证,反之则认证失败,将认证结果发送给客户端。
PLAIN Authentication和EXTERNAL Authentication的认证过程比较简单,所以需要依赖SSL/TSL,如果服务端不支持SSL,就无法使用这两种认证方式。
MYSQL41 Authentication是一种挑战/应答的认证方式,客户端首先会发送一个认证请求,此时通常会携带需要认证的用户名,服务端查询到是合法用户后,会产生一个20字节的随机数作为“挑战”发送给客户端,客户端会将密码和随机数做Hash,生成一个字节串作为“应答”,服务端将应答串与自己的计算结果进行比较,如果相同则通过验证,反之则认证失败,将认证结果发送给客户端。
协议格式
length | type | payload
- 4 byte length
- 1 byte message type
- length byte message payload
使用X protocol的客户端和服务端通过如上的数据格式来封装将要发送的数据,这称作是一个request。这里的payload就是通过protobuf序列化后的数据,也是.proto文件中定义的某一类Message,message type就是该Message的类型,例如认证时需要的Message AuthenticateStart和Message AuthenticateContinue。
message AuthenticateStart {
  required string mech_name = 1;
  optional bytes auth_data = 2;
  optional bytes initial_response = 3;
}
这个Message包括三个字段,mech_name表示认证的方法,auth_data表示认证所需的数据,initial_response表示初次响应的数据。其中required表示必不可少的数据,optional是可有可无的数据,比如PLAIN Authentication就不需要initial_responce字段,EXTERNAL Authentication不需要auth_data字段。
message AuthenticateContinue {
  required bytes auth_data = 1;
}
这个Message只有一个required字段auth_data,通常是密码和服务端指定的随机salt的运算结果,这个Message在MYSQL41 Authentication的认证过程会用到。
通过X protocol建立连接的过程
X-plugin的相关代码都在plugin/x目录下面,这个插件是默认开启的,插件的入口函数是plugin_main,这个函数首先会初始化一个X-plugin的Server对象,从如下代码可以看到,当前可以支持的认证方式有三种: PLAIN Authentication、MYSQL41 Authentication和SHA256_MEMORY Authentication。 这里没有提供EXTERNAL Authentication而且还扩展了与MYSQL41 Authentication类似的SHA256_MEMORY Authentication,两种的区别在于使用不同的Hash函数。
	instance->server().add_authentication_mechanism(
        "PLAIN", Sasl_plain_auth::create, use_only_through_secure_connection);
    instance->server().add_authentication_mechanism(
        "MYSQL41", Sasl_mysql41_auth::create,
        use_only_in_non_secure_connection);
    instance->server().add_authentication_mechanism(
        "MYSQL41", Sasl_mysql41_auth::create,
        use_only_through_secure_connection);
    instance->server().add_authentication_mechanism(
        "SHA256_MEMORY", Sasl_sha256_memory_auth::create,
        use_only_in_non_secure_connection);
    instance->server().add_authentication_mechanism(
        "SHA256_MEMORY", Sasl_sha256_memory_auth::create,
        use_only_through_secure_connection);
最后,plugin_main函数会把net_thread函数下发到任务队列,交给worker线程去执行,如下所示:
instance->m_nscheduler->post(std::bind(&Server::net_thread, instance));
post函数定义如下,由于类成员函数都有一个默认的参数this作为第一个参数,这就导致了类成员函数不能直接赋值给std::function,所以这里结合std::bind将net_thread赋值给Task。
typedef std::function<void()> Task;
bool Scheduler_dynamic::post(const Task &task);
net_thread函数中会先调用ngs::Server::prepare函数将ngs::Server::on_accept函数作为回调函数绑定在Socket_events上,由于plugin_main函数中实例化Server对象时将一个Socket_acceptors_task放到了Server_task_vector中,所以net_thread函数中执行task->prepare(&context)会通过如下的流程实现回调函数的绑定。
Socket_acceptors_task::prepare
		|__Socket_acceptors_task::prepare_impl
				|__Listener_tcp::setup_listener
						|__Socket_events::listen
然后net_thread函数会调用ngs::Server::start函数将run_task函数下发给m_accept_scheduler去执行。
m_accept_scheduler->post([this, task]() { run_task(task); });
只要Server一直处于运行状态,run_task函数就会一直监听端口(不同于常规的MySQL协议,X protocol默认使用33060作为监听端口),当有连接请求到来,就会调用回调函数on_accept来处理请求。 run_task调用流程如下:
ngs::Server::run_task
		|__Socket_acceptors_task::loop
				|__Socket_events::loop
						|__event_base_loop
								|__ngs::Server::on_accept
on_accept函数会用Client_interface指针指向ngs::Client对象,并且将ngs::Client::run函数下发到m_worker_scheduler去执行。也就是每当有connect请求到来,就会让worker线程通过ngs::Client::run去处理。 run函数体如下所示,在on_accept中会设置当前状态为State::k_accepted,并且创建一个Session,后面通过一个while循环来实现批量处理request。通过read_one_message_and_dispatch函数来解析并且处理到来的request,如果当前没有request到来,那么会阻塞在ngs::Protocol_decoder::read_header函数上,否则可以获取到message_size和message_type,然后获取对应大小的payload,对这个payload做反序列化处理,在本地还原一个Message_request。
void Client::run(const bool skip_name_resolve) {
  try {
    on_client_addr(skip_name_resolve);
    on_accept();

    while (m_state != State::k_closing && m_session) {
      Error_code error = read_one_message_and_dispatch();

      // read could took some time, thus lets recheck the state
      if (m_state == State::k_closing) break;

      if (error) {
        // !message and !error = EOF
        m_encoder->send_result(Fatal(error));
        disconnect_and_trigger_close();
        break;
      }
    }
  } catch (std::exception &e) {
    log_error(ER_XPLUGIN_FORCE_STOP_CLIENT, client_id(), e.what());
  }

  {
    MUTEX_LOCK(lock, server().get_client_exit_mutex());
    m_state = State::k_closed;

    remove_client_from_server();
  }
}
由于Client_interface指针指向的是子类ngs::Client的对象,所以m_dispatcher->handle(&request)会真正执行ngs::Client::handle_message,然后通过Session来处理request。 在ngs::Session::handle_message中,会判断当前的connection有没有经过认证,如果没有,那么首先就要去做认证。
bool Session::handle_message(ngs::Message_request &command) {
  if (m_state == k_authenticating) {
    return handle_auth_message(command);
  } else if (m_state == k_ready) {
    // handle session commands
    return handle_ready_message(command);
  }
  // msg not handled
  return false;
}
这里以MYSQL41 Authentication为例,MySQL8.0的认证与官方介绍的认证过程几乎相同,不同的地方在于SESS_AUTHENTICATE_START Message中的auth_data没有携带用户名,用户名是在SESS_AUTHENTICATE_CONTINUE Message中与password一起发送的。 MySQL8.0代码中,首先会检查SESS_AUTHENTICATE_START Message中的mech_name是否是当前服务端支持的认证方式,如果支持就会返回一个随机数给客户端作为salt。如下所示的代码中,首先会把salt(data)赋值给AuthenticateContinue Message,然后把Message序列化成一个string,最后将以length|type|payload的格式发送给客户端。
void Protocol_encoder::send_auth_continue(const std::string &data) {
  std::string out_serialized_msg;
  Mysqlx::Session::AuthenticateContinue msg;

  msg.set_auth_data(data);
  msg.SerializeToString(&out_serialized_msg);

  DBUG_EXECUTE_IF("authentication_timeout", {
    int i = 0;
    int max_iterations = 1000;
    while ((*xpl::Server::get_instance())->server().is_running() &&
           i < max_iterations) {
      my_sleep(10000);
      ++i;
    }
  });

  m_xproto_encoder
      .encode_xmessage<Mysqlx::ServerMessages::SESS_AUTHENTICATE_CONTINUE>(
          out_serialized_msg);
  send_raw_buffer(Mysqlx::ServerMessages::SESS_AUTHENTICATE_CONTINUE);
}
客户端收到这个Message之后需要再发送一个SESS_AUTHENTICATE_CONTINUE Message,其中auth_data是由schema、username以及password和salt的运算结果三部分组成,服务端收到这个Message会验证username对应的password和salt的运算结果是否与客户端的一致,如果一致就将当前状态设置为State::k_ready。 自此,客户端和服务端的连接才建立成功。